Sunday, October 27, 2013

Bedtime!


 For many years we have slept on the floor (on a mattress, that is). As a bed goes, it has some advantages. It's free. It never sags. But it's hard to get out off, especially if you are pregnant. Most people would solve this problem by buying a new bed frame, or maybe a used on on Craigslist. But we are picky, wanting a bed with lots of space under it for storage, and also cheap. So we decided to trade our free time for a home-made bed.


 We bought a bunch of lumber from home depot, 2x4s, 2x6s, and some OSB. Thank goodness we have a RAV4 to cart it all home in! Then we cut it all to length, making only one mistake out of about 50 cuts.
One of the features we wanted was a headboard. We found a design we liked at Ikea and then built something similar out of 1x3s. This was the only place we cut something the wrong size. Next time you visit, see if you can figure out what we did wrong!

 
The bed has more legs than is traditional. They also serve to keep the mattress from sliding off the top. 
 
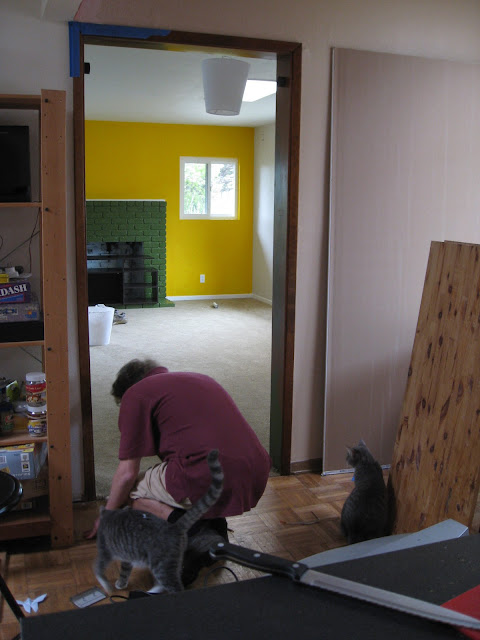
A bed needs a place to go. Our old bedroom barely held our king-sized mattress, so we decided to re-purpose Jymm's crafty room, shown here in it's former glory. Don't worry, we just moved her craft-space somewhere else.

And the final product. We decided to add a little pizzazz to the new room while we were at it, so we hung some drapes behind the bed. They serve the added purpose of dampening the acoustics in the room. We think the end result looks quite grown up. Almost like we're adults or something!

Sunday, September 8, 2013

Stumped... no more!

When we toured this house, the yard was a lovely place with a beautiful shade tree in the middle. Our first act as homeowners, before we were even technically owners of the home, was to start killing that shade tree. Because there's nothing we hate more than nature!

Really, it was because the lovely shade tree had lovely roots that were making their lovely way under our lovely foundation. But that's just details.

It only took us a couple of months to chop down the tree. But then we were left with a mammoth stump in the middle of our yard just sitting there waiting for the termites to find it. So what did we do then? Dig a giant hole around the stump, of course! Who wants an attractive yard when you can have a deathtrap instead?

Long story short, after nine months of digging and hacking at the roots as they were exposed - it actually became a party game at our Memorial Day bbq!- the stump was finally cut free of it's moorings. So now we had a giant stump in a hole, with no way to get it out.


Fortunately, all that science and engineering education finally came in handy! Alan attached a giant lever, with which we could rock the stump back and forth despite our puny muscles. We then proceeded to rock and roll it, meanwhile backfilling the hole. The screws we used to attach the lever kept breaking, but otherwise things were going along smoothly.

This morning we started with the stump 2/3 of the way out, like so:


Eventually the stump was so close to the top of the hole that it seemed like we could just lever it out the rest of the way - if only the lever was in the right place. But our last screws were broken, so we were screwed. 2x4s and cement blocks allowed a different kind of levering that worked much less well, but another sweaty hour later, the stump was out. Man, that felt good - almost as good as the shower that came just minutes later.


Did we mention this whole endeavor transpired during a heat wave?


Sunday, May 12, 2013

Curtains!

Finally, finally got these finished. Alan should go out of town more often!


Saturday, May 11, 2013

Making a Splash

First, let me apologize for the lateness of this post...we did this project in October 2012, and are only posting about it now. We've recently decided that our blogs might be better served if we didn't insist on writing the posts together. So today you get a post by Jymm!


Above you see a lovely before picture of the backsplash behind the stove. This was a leftover piece of the old counter that the previous owner had resourcefully put in place of a backsplash. While the old counter was still there it didn't really look that bad...but once we replaced the old counter and put the tile backsplash around the rest of the kitchen it really looked out of place.

Enter: The Tile!! Notice the decorative stripe down the center made of slightly smaller tiles? That was our way of finessing the size so that we did not have to cut a single tile.


We pulled the stove out, took out the fume hood, and took out the old backsplash. Here's what it looked like once we'd torn everything out- gross!


The actual tile laying took about thirty minutes- tile really is the easiest thing I've had to do on the house. Which is pretty good because pretty soon I'll have a whole shower to tile. I imagine it will seem a lot harder once I actually have to cut the tile!

Here's what it looked like once we had all the tile laid, but before we rehung the  hood:

And finally, once we had the stove and hood back in place, here is what the final product looks like:


Saturday, October 6, 2012

One year (plus!)

On May 21st, 2011 we first toured our future home, at the time having no expectation that we would be bidding on it, because we were "just looking". Many twists and turns later, it just worked and the house became ours. Now, a look at what has changed after 1 full year of occupancy.

The living room/dining room has since been joined to the kitchen, for one of the largest changes, and one that we completed more or less before even moving in! This room is so great. (Eagle eyed readers may notice that the same chair appears in both pictures. We have not hesitated to use the many "gifts" that came along with the house)

A lot of this picture hasn't changed, but oh what a difference for the parts that have! You can't really tell how worn out and ugly the old counters were, but let me tell you, they needed to go (now they live in our garage, in a pile on the floor!). The sink, which you can just barely see on the left side of the "before" picture was a cracked porcelain nightmare- it's been replaced by a shiny stainless steel beauty! Note: said nightmare fetched $20 on craigslist - no accounting for taste!

This is probably the biggest change. I'm GLAD there was asbestos in the ceiling! If not, this might have stayed this way for years!! It has really become our favorite room- Alan uses it for an office, and at night it becomes a great place to play board games and video games with our friends! Apparently we are still 14. Our cats also love the room. They love it so much they leave lots of themselves behind when they leave it.


This was an OK place to hang laundry, except that it was far away from any door. Then we renovated the asbestos room, and bam!: door, and a window magically materialized. Suddenly we cared what it looked like on this side of the house. 6 months later, we tore out the clothesline and pulled up the old pavers, and redid  the whole thing.  Ok, so it's a little messy, but  oh so much nicer.
Looking at this, you might thing we got the "before" and "after" pictures mixed up. No. The backyard is the one place that we have managed to make noticeably less nice. We started by tearing out the only really good shade tree (take that, tree!). Then we neglected the grass so much it died (take that, grass!). Now we've dug a bunch of holes in the ground to put in the new trees. Hopefully someday we might achieve the beauty and grace that attracted us to this yard in the first place.


A year has really made a big difference here. After many months it finally started to feel like OUR home, rather than some place we were living. It will be interesting to see what changes the next year brings. Alan hopes most of them will be cheaper than this year's!

Sunday, June 3, 2012

Tile Death Do Us Part

A long time ago, we put in new kitchen counters (laminate, none of that granite that every flipped house in San Diego has).  It was such an improvement over the old counters (and sink) that we wanted to start using it immediately, and never stop. So 6 months passed before we got around to finishing it, by adding a tile back-splash. Meanwhile, it looks like we got a little water damage - oops! The thing is, neither Jymm nor I had ever worked with tile. It looked scary. Easy to mess up. Technical. Perhaps Best Left to Professionals. 
The first few tiles have been placed. Jymm puts them on, and Alan uses a Sharpie to color the edges black. 
We were crazy. It turns out Jymm's baking skills really came in handy- spreading that stuff you use to attach the tiles to the wall was just like spreading icing on a cake (Note: it doesn't taste like icing). Laying the first course of tiles across the one wall took maybe thirty minutes. The grout (really silicon caulk in this case) took another 45 minutes. Then we were done!

Done! (Except for 90% of the grouting. And the other wall).
We had such a fun time doing this we've decided to tile the whole house- walls, ceiling, everything. Pretty soon the whole place will look like you've walked into a Tetris game- awesome! Of course, we haven't yet finished the kitchen. And we still have to tile the shower in the master bath. So...we'll see how we feel about it after all of that.

Sunday, May 6, 2012

The little details count


One day I (Alan) awoke to find a kitty sleeping on the island - bad kitty, you are not allowed there! Well technically he wasn't "on" the island. I'm pretty sure he thought that made it OK because as soon as he saw me he started purring. This is one of those times I told Jymm I was pretty sure the cats take after her side of the family.

Many days later I wanted to blog about how we were finally finishing off the paint job and decoration in our living room, but wouldn't you know it - I couldn't find any good pictures of the un-decorated state. But if you ignore the cute kitty (hard, I know) you can probably see some of the disarray in the background. Our open Ikea bookshelves were great in our old apartment, but didn't make such a good centerpiece in our new living room - plus they were a "junk magnet". After swearing to never buy another new piece of furniture again, we finally broke down and bought a nice Ikea solid wood bookshelf to replace it (don't worry, it was on sale).

Nothing is ever that simple, at least when I'm around - I pointed out that it would be silly to put up the bookshelf just to move it later to finish the paintjob behind it. So first, we painted the walls to cover up the construction done way back before we even moved in, which opened up the kitchen into the living-room. We've been living with bare Sheetrock ever since - sometimes cleverly covered up, as in the bookshelf example above.

So painting a wall - simple right? But our real choice was to paint the entire room, or try to find the matching paint color. It was painted just before we bought the home, so it seemed silly to redo the room, and that gave me the idea we might be able to find the same color at our local Home Depot. Jymm loves looking at paint chips, so this was the perfect job for her. She brought home a whole bunch of samples - one of which was a perfect match - yay!

So once again we pulled out the painting clothes, threw some drop cloths down, and got to it. When we finished painting this part of the wall we were so excited with how it looked that we kept going! The header the contractors put in to replace the wall was still bare, and there was another section of wall they'd had to replace. In actuality we probably spent about two hours of our weekend on this project, but it made a huge difference in how finished the room feels, as does the new bookshelf.

Sunday, March 25, 2012

Asbestos We Can - no wait, we can do better: From Asbestos to the Best-os

This was our family room, as photographed by the listing agent way before we bought the house. Style: 70s. Maybe even 60s. It even came with a matching painting, which you can just barely see to the left. Jymm was never a fan (painting, or room). Alan didn't mind the style. Maybe it even secretly grew on him. 

Wasting no time, we immediately renovated. 
Pleased with the results, we kept it this way for several months. Sometimes we carefully moved a pile of things from one corner to another, then moved it back. Sometimes we even cleared some space on the floor to add more stuff. But mostly it just looked like this from the day we started moving in until just before the next renovation began.

During Christmas vacation, while Howard and Barbara were visiting, Jymm got the bright idea to rip off some of the paneling in the room to get to the wiring beneath. In the process some of the popcorn, which we suspected contained asbestos, was knocked off of the ceiling. Several weeks later we confirmed that there was asbestos now floating in the atmosphere of our house and decided that sealing the room off would somehow help. At least it made us feel better. Then we hired some professionals to take care of the rest.

We figured while they were in there they might as well make it prettier. So along with encasing the ceiling in dry wall, they tore down the paneling, and the layer of paneling under the paneling, added a window and a door and a cat door (long story).  They also replaced the carpet, since it was contaminated with asbestos. To the left you can see the new door being installed. Quite a gap there, eh? I filled it with some fiberglass when they weren't looking.


It took them a little over a week to do the whole job, except for the carpet which was left for after we did our part. To save costs, we did the cosmetic stuff- painting, molding, lamps, all the while laughing at the cats while they tried to figure out how to use the cat door.

We took a full week just to do 90% of the painting. I expect the contractor would have done it in a day. Meanwhile, the only real drama of the project occurred: the stucco around the newly installed doors and windows started to crack. A lot. At first the contractor said it was normal. Alan did not agree. After about 2 weeks, the contractor came around to Alan's point of view, and had the worst parts patched.


Then today, finally, a week and a half after the carpet guy had come and gone (to be fair, we were pretty sick last weekend) we unsealed the room! Of course, the first thing we did was hook up the video game systems. Yep, we did all of that work in order to have an entire room to play video games in. And it is awesome.

Fun fact: If you stand in a particular place in our red kitchen and gaze toward the yellow wall in the family room you can imagine that you are in McDonald's. All we need now is a ball pit.

Sunday, January 8, 2012

Our Own Private Island, Part 1: IKEA Gets Our Money

Our first major project was to build an island for our kitchen. We wanted to add some counter space and a lot more storage. Little did we realize the time and effort this would require (you will see this sentence repeated often)! First we mocked up the island with a bunch of boxes and a bookshelf to get an idea of what size would work in the space. The kittens really loved playing in the boxes (I don't think they like the finished island half as much). Then we used IKEA's 'AutoCad lite' to figure out what kind of design we could fit in the allotted space.

On the big day we went to IKEA and gave them more money than we ever have spent there before (still, quite cheap for kitchen hardware) and (just barely) stuffed it all into our Camry.  Jymm's tetris skills come in handy! That evening we assembled the base cabinets.  It went rather quickly and we were feeling quite impressed with ourselves. How much longer could this really take?

           To be continued...

Sunday, October 9, 2011

The Story So Far...

This summer, after returning from our adventures in Europe, we decided to brave the real estate market. What we ended up with is what my boss succinctly calls a "fixer". Here are some pictures of the house at the time that we bought it and some pictures of it's present state. We'll try to update here once a week on our ongoing progress.
This is the enclosed patio, before we moved in. A nice, open space, with a nice view.

Now, after living here a month, the space is entirely different. The 'nice view' is now inside. Aren't they cute? Jymm dreams of some day cleaning out the box pile in the patio, so that we'll have TWO views.
See the line that goes across the ceiling and down the far wall? There were walls there- our first act as homeowners was to demolish two of the walls in the house to open up the kitchen into the living/dining room.

Here's what that space looks like now. You can see we have not yet put floor in where the walls came out. We have big plans for this kitchen. Check back before the year is over!

 And, finally, here's a photo taken from the bottom of the back yard


So, as you can see, we've got our work cut out for us. Redoing this area is part of our "5 year plan".